Recreational Vehicles, also called RVs, offer a leisurely, convenient, and comfortable method of travel. But like any motor vehicle, they also require regular maintenance to operate safely and to avoid costly and unforeseen pit-stops. By performing the simple and routine maintenance checks in this article, you will ensure that you and your family have a smooth, fun, and exciting journey to your destination! After all, road trips are a staple to domestic travel in the US and should be time spent seeing the natural beauty of the country while relaxing with friends and family. By the end of this article, you will be ready to take on your next big road trip with peace of mind behind the wheel as we will discuss comprehensive RV checklists and some recommendations on must-have equipment, such as RV skirts and other innovative products by companies such as EZ Snap.
When planning an RV trip, one of the most important things that must be done is a proper and thorough maintenance check. This is a comprehensive check of all your RV’s major and critical systems, like tires and electrical systems, which ensures that you have a functioning vehicle that will provide a smooth and safe journey. Neglecting pre-trip checklists and maintenance oftentimes leads to unexpected and costly repairs that offer nothing but stress and anxiety during your travels. In this section, we will be going over the most important components of a pre-trip maintenance checklist and what to do in the event something unexpected comes up, or you run into issues during your pre-trip inspection.
What to inspect before leaving for a trip in your RV
- Tires- Be sure to thoroughly inspect each tire (including your spare!) for tread depth, tire pressure, and overall condition. Check your manufacturer’s recommendations to get the best tire pressure for your RV, and just do a simple visual inspection of the inside and outside walls of each tire. Do you see any bald spots, or even worse, wire showing through? If so, it’s as good a time as any to get those tires replaced to avoid any dangerous blowouts on the highway.
- Brakes- Check the callipers, brake fluid level, and brake pads if you have them. This can all be done with a simple visual inspection, but if you’re having difficulty seeing the brake system, try turning your wheels to one side to get better access for your inspection. Your brake pedal should also feel firm when you press on it.
- Lights- You will want to ensure that all of your lights are working properly before you hit the road as well so the drivers around you can see you and know when you are turning, changing lanes, or slowing down/stopping. It is easiest to have a helper with this one to tell you if your lights are working or not when you test them. One of you will get in the driver’s seat, turn the engine on, and shout which lights you’re currently testing-brake lights, front and rear turn signals, hazard lights, taillights, and headlights (high and low beams)…see why its easier to have a friend? Alternatively, you can set your phone up to record video in front of, and then behind your vehicle as you run through all the combinations of lights, check the video to make sure all is working!
- Electrical- This can be a little trickier, especially if something is not working properly, but your first course of action is to simply start the engine…if it starts up without a problem, you’re looking pretty good, if not, it will likely be a trip to the shop unless you are mechanically inclined. Easy and important things to check though (whether it started on the first try or not), is to look for corrosion on your batteries (yes you likely have two in an RV, one to start the engine, and a “house” battery to run the RV when parked). It will look like pink or blue crystals built up on the battery terminals and is easily removed with a wire brush and baking soda/water mixture, be sure to wear properly fitting protective equipment like rubber gloves and safety glasses. You will also want to do a visual check on your alternator and any other electrical components including your fridge, heating system, A/C, 12v outlets, etc.
- Mechanical- Do you know when your last oil change was? If not, consider getting another done before your trip. Did you know that engine oil not only breaks down with mileage but also with time? Old oil can be as bad for your engine as heavily used oil, as the components break down over time and the lubricating quality does not work after a certain number of months. The recommendation is to get an oil change every 3,000-5,000 miles or every 6 months. Does your engine make any kind of whining or screeching sound when you start it up? Probably a loose belt that needs to be replaced. How about when you turn your wheels, does it make a groaning noise? If so, you may be low on power steering fluid or have an issue with your power steering pump.
- Plumbing- The job that one unfortunate soul gets stuck with-every single. time…It’s not a pretty job, but it needs to be done regularly to ensure a properly functioning toilet in your RV, if we wanted to be camping, we have brought a tent, right? You will want to check all of your tanks and “Summerize” tanks by rinsing out and flushing the winterizing RV treatment that you should be using every year. This includes your water tanks, black tanks, and gray tanks, which hopefully were properly cleaned and treated after your last trip, otherwise, you’re in for one heck of a cleaning job that nobody wants to do. You will want to check and test your lines, water heater, and water pump for overall functionality and any leaks by putting water in your system and testing out each component-turn the water heater on, test each sink with open cabinets to look for leaks, flush the toilet, then look under the RV to ensure there are no visible leaks. You’ll also want to test your drinking water hose for leaks before departure, they can be expensive on the road.
- Propane- Check the dates on your propane tanks to ensure they are still within the legal, usable date. When that is verified, connect your propane tank to your RV, and test all of the propane appliances and lines by turning them on (stove, oven, 3-way fridge), and spraying soapy water over the main propane lines to look for leaks (presented as bubbles on the hose).
- Exterior- Look for any chipping paint, loose parts, dry rot, etc. Do a thorough walkaround of your RV to visually inspect the all-too-often flimsy fenders and wheel wells to ensure everything is still connected and sturdy. While you’re at it, check the spare tire holder to ensure it is sturdy, and get under your RV one more time to check for any alarming rust or damage to your frame, slider motors, axles, etc. If something looks “off”, it is likely worth a closer inspection by you or a professional.
- Interior- This is not just for creature comforts, but also safety. Make sure to inspect all of your emergency exits and that the hatches and hinges are all functional. Check the date and functionality of your fire extinguisher and all of your fire alarms and your VERY important carbon monoxide alarm. Other than that, make sure you have all your insulating window covers (regardless of season), extra blankets, pillows, towels, etc.
If you do happen to find an issue during your pre-trip inspection, it is very important to have the issue fixed before departure, which is also why it is important to do this checklist at least a week in advance, and once again the day before you leave. Be sure to give yourself plenty of time for last-minute discoveries that will put anyone’s safety in harm’s way.
Depending on the severity of the issue, you may have to bring your RV into a shop to see a professional to get you back on the road safely. It is very important to not attempt any repairs on your RV that you are not comfortable with or lack the experience to complete properly, such as a brake job. Consider purchasing roadside assistance insurance that includes a rental car and hotel in the policy before your trip as well.
Engine and Transmission
The engine and transmission are arguably the most important parts of your RV because, without them, it’s just a big hard-sided tent that you can’t move! The engine and transmission are what deliver the power and directional torque to move your RV, and need special attention and maintenance to work properly, especially as more miles are put on your RV. Once again, any neglect in maintaining the engine and transmission of your RV has a high likelihood of leading to costly and unexpected repairs on the road, so be sure to pay close attention before it’s too late.
Best practices for maintaining your RV engine>
- Oil changes at regular and recommended intervals. As mentioned earlier, most manufacturers advise changing your oil every 3,000-5,000 miles or every 6 months. This is essential to keep the very hot and very fast-moving metal components of your engine properly lubricated. Ever seen old motor oil with shiny flakes in it? That is ground metal from engine components due to an improperly lubricated system…which is very bad.
- Replacing oil and air filters at regular intervals. Every oil change typically means a new oil filter, and new air filters to ensure the flow of everything is at peak levels and there are no restrictions along the system This helps keep your fuel economy at its most efficient as well, which is an essential factor for many on long RV trips.
- Check fluid levels regularly. Just because you haven’t hit those 5,000 miles or 6 months, doesn’t mean the oil in your engine is not breaking down. Especially on a road trip in your RV, be sure to check your oil levels every time you fill your gas tank. Also, while you’re at it, be sure to check all of your system fluids as necessary, such as your brake fluid levels, windshield wiper fluid, coolant, and power steering fluid.
- Check belts and hoses for wear. As mentioned earlier, this is a pretty easy one to hear when you start your engine or turn your wheel. Most of the time, your belts let you know when they need some attention via a very high-pitched squeal, which is the sound of the belt slipping. If it’s constant when you turn the engine on, it’s likely your serpentine belt, if it is only when you turn your wheels, it is likely the power steering belt. Hoses can be a bit trickier as they are typically for compression (air) in your engine. If you’re having a loss of power or notice a hissing noise, break out that spray bottle of soapy water from earlier when we checked your propane system, and spray the compression hoses to look for leaks.
- Check your batteries. We already went over this one, but it’s important enough to mention again in this article as it is a very common startup issue that can be easily remedied without much mechanical knowledge. Big thing is to check for corrosion, which will present itself as blue or pink crystals building up on the battery terminals. Oftentimes when this is the issue, all you have to do is remove the clamps from the terminals, and scrape or brush away the corrosion. Baking soda in water works wonders, but be sure to wear proper protection including rubber gloves and eye protection.
Best Practices for Maintaining your RV Transmission
Very similar to engine maintenance, transmission maintenance largely involves changing lubricating fluids and filters at regular, manufacturer-recommended intervals.
- Change fluids at regular intervals as recommended by the manufacturer. Typically, transmission fluid is recommended to be changed every 30,000-50,000 miles.
- Replace the transmission filter on your RV with every transmission fluid change. This helps to keep your transmission fluid clean and free of debris.
- Check for leaks around your transmission and repair immediately if a leak is found, one way to passively keep an eye on this is to look at the ground under your RV to see if there are any fluids near the transmission.
- Drive conservatively whenever possible, this reduces the strain on your transmission when shifting gears and will prolong the life of your factory RV transmission.
Exterior Maintenance of your RV
Exterior RV maintenance is more important than most people think before RV ownership. RV’s are typically built to have a greater focus on being lightweight than ultra-durable, and that requires a little more TLC than your normal motor vehicle. Being constantly exposed to the elements, road debris, salt in the winter, etc., they are prone to leaks, rust, and potentially rot (depending on where they are kept). Use the following checklist to ensure the longevity of your RV’s exterior.
- Clean your RV regularly. Regular cleaning of your RV removes dirt, road grime, grease, oil, insects, and other debris that can cause damage to your RV over time. Similar to a car, you want to hose the exterior down before scrubbing with a soft, microfiber brush or towel to avoid scratching the paint during cleaning.
- Check the roof for leaks after big storms, snowfall, and taking out of storage. Also, be sure to check all windows and the cabinets along the corners of the wall and ceiling- sometimes leaks like to hide in there and you won’t find them until you see visible water damage. Consider purchasing and applying RV roof sealant every 5-10 years. Be very careful walking around on the roof of your RV as well, especially if there isn’t a ladder attached from the factory as that typically means the roof is not designed to be regularly walked on. Just like walking around in an attic, be sure to look for the studs and only step on those studs, otherwise, you may send a leg through your roof!
- Clean and dry the awning after every trip and before storing it for the off-season. Just like a tent, you never want to roll up and store a wet awning as it will grow mold and mildew that will deteriorate your awning and can cause potential health implications. Use a soft brush and a mild cleaner to clean your RV awning.
- Check your tires (including your spare tire!). This one has come up a few times now… may be due to the high importance of having tires in good condition! Be sure to check your tires’ tread depth, sidewalls, air pressure, and visual condition periodically, and every time you depart on a trip. You’ll want to keep a keen eye out for any bulges or bald spots as well, which means that the tire needs to be replaced ASAP.
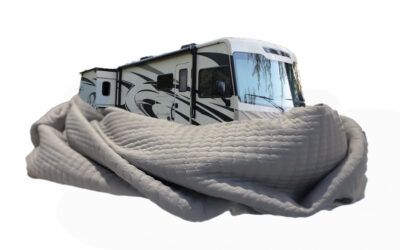
For a high-quality line of products designed to protect your RV and improve your overall quality of time while traveling, consider checking out EZ SNAP. EZ SNAP specializes in exterior RV products such as RV skirting, RV insulation, and RV sun protection. EZ SNAP is most famous for its RV skirting, which is used as a barrier around the bottom of your RV to prevent wind, rain, snow, and dust from entering the underside of your RV while parked and camping.
Not only does EZ SNAP skirting help prevent unnecessary damage to the undercarriage of your RV, but it also provides the best layer of insulation that you can get for your RV. If you have ever camped or slept in a hammock without any insulation under your body, you know what we’re talking about. The wind that blows under the RV is a huge heat drain and will reduce the overall interior temperature of your RV by several degrees, at best, skirting eliminates this.
Maintaining your RV Interior
Maintaining the interior of your RV can be as important as maintaining the exterior of your RV due to safety and health implications. Maintaining the interior of your RV is what ensures you have the comfort and safety of home while on the road, and the following checklist will help achieve that goal.
- Clean the interior regularly, including the floors during and after every trip to maintain a non-slip and clean entry to your home on wheels. It is very difficult to get into the heating system of an RV, and most often the heat registers are on the floor. You will want to ideally vacuum the floor of your RV every few days on the road and especially when you return so debris and dirt do not end up in your heating ducts, then blowing everywhere inside your RV when you need to turn the heat on, leading to a higher risk of respiratory illness or allergies. Also with the kitchen oftentimes in the most heavily trafficked area, there is a higher risk for grease splatters on the floor that can create a slipping hazard. You will also want to dust, wipe down surfaces, and remove any travel dust that may have entered during your trip.
- Check appliances for functionality. Turn on all your systems before departure so you can ensure a safe and comfortable experience. Test the stove, refrigerator, freezer, heating, A/C, any slide-outs, water tanks, water systems such as sinks and showers, circuit breaker box (have spare circuits), and any other interior systems that are critical to your safety and comfort. You will also want to make sure that all appliances that run on either propane OR electricity are functional in all modes; for instance, make sure if you have a 3-way fridge that the house batteries, propane tanks, and shore power are all working properly before leaving for your trip.
- Check for any water or fluid leaks, particularly in overhead cabinets that occupy the corner between the wall and ceiling, that’s a great place for water damage to hide. Looking under your sink and clearing out any pea traps is also a great idea before leaving on a trip to ensure your plumbing is not backed up in any way. Fill your water tank and turn on each sink and shower, one at a time to isolate any potential leaks. Having a helper to quickly look for leaks under cabinets is also very useful to quickly pinpoint leaks while minimizing water damage.
- Test electrical systems, as previously mentioned, turn on all systems one at a time to isolate any issues and get them repaired immediately by a professional if problems are discovered.
- While checking for leaks, if any water damage is found, also keep a keen eye out for mold damage that could create long-term health implications. This can look like anything from dried water stains to black spots with fruiting bodies of mold growing. If you can see mold, it is a problem that will need professional remediation and potential replacement of insulation, wall paneling, roofing, cabinetry, etc.
- Check all emergency systems such as your smoke detectors, CO alarms, fire extinguishers, and med-kits. Restock anything that needs to be restocked and replace anything that needs to be replaced. There will be expiration dates on most of this equipment that you can refer to, or simply replace with fresh batteries before your trip.
Maintaining your RV Electrical and Plumbing Systems
- Drain and flush the water systems after each trip and properly winterize your tanks every Autumn. This will help prevent any clogging due to hard water or mineral deposition and make it difficult for mold and mildew to colonize your tanks.
- Use water softeners to minimize mineral deposition in your tanks and lines, further increasing the longevity of your factory systems.
- Check all electrical connections such as fire alarms, radio, hitch connections, etc.
- Use surge protectors when connecting to shore power or a generator to add one more level of electrical protection to your trip. They make special surge protectors for RVs that should always be used when plugging your RV into a power source.
Properly Storing your RV
Properly storing an RV is a very important part of RV ownership to mitigate damage from the environment, pests, and other factors that can cause wear and tear to your vehicle while it sits waiting for the next trip.
Some essential tips for storing your RV are:
- Clean your RV every time you return from a trip.
- Empty the water tanks and make sure they are dry before storing them for an extended period.
- Winterize your RV by emptying the water tanks, and water heater, and using a specialized RV antifreeze that can be placed down each sink, shower, and toilet drain.
- Cover your RV with a high-quality RV cover to prevent environmental damage from the weather, sun, pests, etc.
- Disconnect batteries and keep them in a warm place until ready for use, and always connect to a battery tender to keep the charge and health of your batteries up.
Tips for long-term storage of your RV:
- Use a climate-controlled RV storage center. These are the most expensive option, but also the most guaranteed option for keeping your RV properly stored when not in use.
- Check your RV regularly by removing the cover, inspecting for water or rodent damage, and regularly repairing what needs to be repaired.
- Use tire covers to keep your tires out of the sun and to minimize any dry rot and exposure to the elements.
- Consider RV-specific storage products such as EZ-SNAP skirting, window covers, and tire covers. There are also specific anti-mold cleaners that are very useful and great to have.
As we have been discussing at length in this article, preparedness while traveling in your RV is critical to avoid costly accidents, and to ensure a smooth, safe, and fun trip for everyone. Some emergency supplies that should be kept in every RV include but are not limited to
- Basic first aid kit to treat injuries and know how to use it in the event of an emergency. You should be able to treat minor injuries and illnesses while on the road or camping.
- Emergency food and water supply need to be kept in a safe location and out of sight, such as under the main bed. This should not be kept anywhere that wildlife, other travelers, or cold temperatures can get to. Not much sense in having extra water if it’s frozen!
- Flashlight/headlamps, and extra batteries in the event of a power outage in the evening.
- Portable, hand-crank radio for weather and emergency reports
- Tool kit with basic hand tools for minor repairs
- Emergency warmth such as blankets, hats, gloves, hand warmers, and propane heaters such as a Mr. Buddy heater.
- Fire extinguisher
Even with all the planning in the world, accidents and emergencies can still happen. It is best to stay calm and know exactly what it is that you need to do in any given situation, and the only way to ensure that is through training and practice. In the event of an emergency on the road in your RV, be sure to
- Stay calm. Easier said than done, but staying calm not only helps to make more logical decisions but also aids in keeping those around you calm, which fosters a much better environment to figure out what comes next.
- Take an emergency preparedness course such as the Wilderness First Responder course offered by organizations such as NOLS Wilderness Medicine, which specializes in backcountry medical stabilization and emergency preparedness in a remote setting.
- Follow safety protocols while driving. If you need to pull over or make an unexpected stop, pull over as slowly as you safely can, turn on your hazard lights (that you checked to make sure worked before leaving), and evaluate the next move from there.
- Dial 911 to activate emergency services if you need emergency or medical assistance.
- Have a plan for emergencies and discuss it with your group before you depart on your trip, such as a meeting place if separated, informing friends about your location, and sharing emergency contact information with everyone.
Additional Tips and Tricks for Maintaining your RV
Owning an RV is no simple task, and it comes with a lot of upkeep, maintenance, and preparation. However, if you follow the tips in this article and the following list of additional tips and tricks, you will be off to a fantastic start to a relaxing and rewarding travel experience.
- Keep a regular maintenance schedule so you’re never guessing what is “due” or needs to be looked at more closely.
- Check the roof regularly for leaks and damage, as this is one of the first places where damage will inevitably occur over time.
- Use high-quality cleaning products that are specifically made for RVs, as they will be gentle enough to use on the paint, yet strong enough to remove dirt and road grime.
- Check tire pressure and maintain it at the manufacturer’s recommendations. Also do visual inspections of tires regularly, looking for bulges or bald spots.
- Find reliable RV specialists in your area to help diagnose and repair things outside of your ability. These are also great places to get advice as you build a relationship… don’t just go and ask for free advice.
- Join RV clubs and forums. This is where you go for free and knowledgeable advice from experienced RV owners.
- Use RV and tire covers to protect the exterior of your RV.
- Always keep a basic toolkit and fire extinguisher on board for emergencies and minor repairs.
FAQs:
Q. What is the best way to maintain an RV’s exterior?
A. The best and easiest way to maintain your RV’s exterior is by cleaning it after every trip and storing it under an RV cover.
Q. How often should I perform an RV pre-trip inspection?
A. RV pre-trip inspections should be completed a few times before leaving on a trip. For example, check all the major systems that would require a trip to the shop at least 4-6 weeks before you leave. Other pre-check items can be done during the week of departure, such as checking tire pressure and your smoke and CO alarms.
Q. What supplies should I keep in my RV for emergencies?
A. As discussed earlier, you will want to keep extra food and water, blankets, flashlights, batteries, fire extinguishers, first aid kits, and an emergency plan that is shared with the group.
Q. How do I find a reliable RV maintenance professional in my area?
A. The easiest way is a simple web search for local RV dealers or shops. Also, ask any friends you have in the area who own an RV and read reviews online.
Sources
- RV Owners Course: Motorhome Maintenance Checklist – Campers Inn
- rv maintenance checklist
- Official RV 101® Guide -RV Preventive Maintenance Checklist
- RV Maintenance Checklist | RVshare Owner Toolkit
- RV Maintenance Checklist (2023) Annual, Semi-Annual, Monthly
- The Ultimate RV Maintenance Checklist for Every Season