The 5th Wheel Front Enclosure: Sealing the Coldest Corner of Your Rig
Seal the front cap and pin box of your fifth wheel to stop the wind, hold the heat you are paying for, and gain hidden storage. A no-drill, DIY-at-your-own-pace front enclosure built on the EZ-Snap® snap system.

Walk the perimeter of a parked fifth wheel on a cold morning and your hand finds the cold long before a thermometer does. It pools under the front cap, in the open cavern around the pin box and hitch, where wind funnels straight through the gap between the truck bed and the trailer's belly. Standard side skirting closes off the long, flat runs down each side. The front is a different animal: raised, angled, interrupted by the hitch, and awkwardly shaped enough that most skirting jobs quietly skip it.
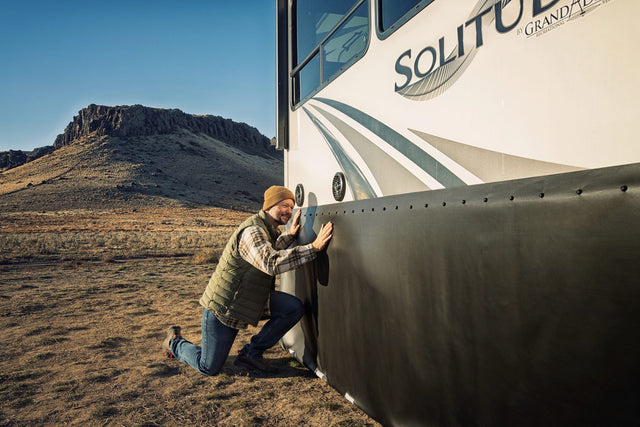
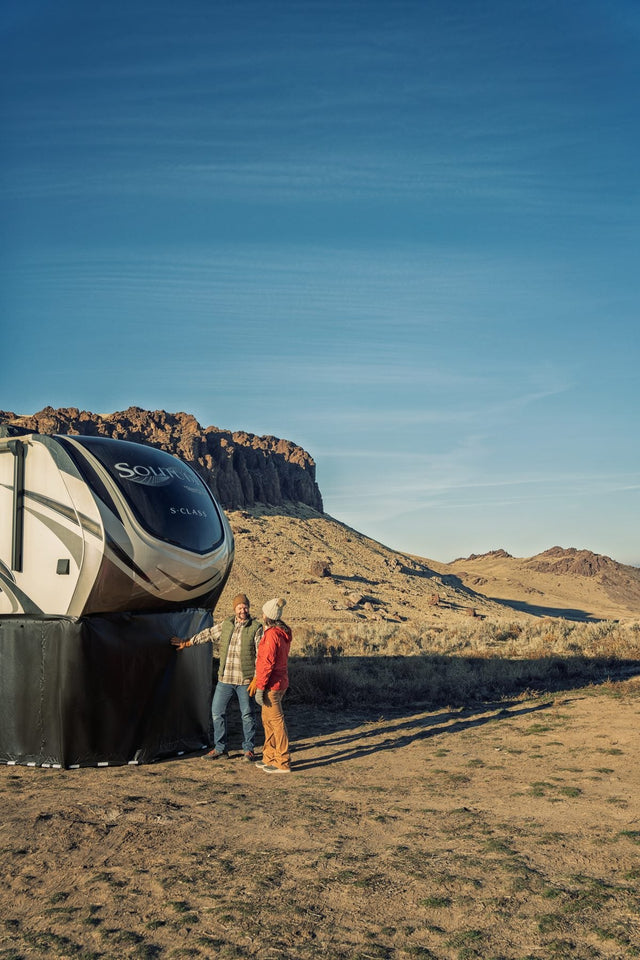
This guide is about closing it properly. A 5th wheel front enclosure wraps that front cap and pin-box area so the wind stops, the underbelly holds the heat you are paying for, and the dead space you have been walking past becomes clean, out-of-sight storage. If you are the type who would rather do it yourself, a DIY 5th wheel front enclosure is well within reach: no drilling, household scissors, and a patented snap system that was built for exactly this geometry.
EZ-Snap has been building no-drill RV skirting since 2006, and has served more than 38,000 customers across its products. Here is how the front piece works, why it matters more than the sides, and how to fit it yourself.

What a 5th Wheel Front Enclosure Actually Is
Every fifth wheel has the same distinctive silhouette: a raised front section, the "front cap," that overhangs the bed of your tow vehicle and drops down to the pin box and hitch coupler. When the trailer is parked and unhitched, that whole front triangle sits open to the air. Cold rolls in under the nose, wraps around the pin box, and pushes back along the belly.
A 5th wheel enclosure is the panel work that closes that front triangle off. Where side skirting handles the two long walls, the front enclosure handles the harder shape: the sloped nose, the two front corners, the vertical drop to the ground, and the notch where the hitch and pin box interrupt everything. Done right, it turns an open, wind-scoured cavity into a sealed, protected pocket under your rig.
It is the single piece most people leave unfinished, and it is usually the piece doing the most damage to their heating bill.
Why the Front Cap Is the Coldest Corner of Your Rig

The wind tunnel under the overhang
The front of a fifth wheel is shaped like a scoop. Air moving across your site catches the overhang, accelerates through the narrow gap around the pin box, and drags heat off the underbelly as it goes. The sides of your rig might be tucked behind skirting, but if the front stays open, you have left the mouth of the tunnel wide open. The wind still gets under there, and it still finds the plumbing, the tanks, and the floor above them.
The heat you are paying to lose
Skirting works by trapping a still cushion of air under the rig so your furnace is not fighting a moving-air windchill all night. EZ-Snap skirting can trim heating and propane use by up to 40% once the perimeter is closed. The key word is closed. Leave the front cap open and that still-air cushion never forms at the nose, where the pin box, the front storage, and the leading edge of your holding tanks all live. Sealing the front is not a finishing touch on a skirting job. It is the part that lets the rest of the job do its work.
How a Front Enclosure Differs From Standard Side Skirting

Side skirting is close to easy. You are covering two long, mostly flat walls, and the material runs in near-straight lines from the sidewall down to the ground. A front enclosure asks more of the system, because the geometry is three-dimensional:
- The sloped nose angles back as it rises, so the panel has to follow a face that is not vertical.
- The front corners turn tight, wrapping from the side plane around to the front plane without gapping.
- The hitch penetration means the material has to meet the pin box and coupler and seal around them, not simply run past.
- The height at the nose is often taller than the sides, so the drop to the ground is longer and less forgiving.
This is exactly why a bordered, one-size panel does not cut it up front, and why people search specifically for a 5th wheel front hitch enclosure RV skirting kit rather than generic skirt. You need a material that trims to any shape and a fastening system that can turn corners and follow a slope without a single hole drilled into your rig.
How the No-Drill Snap System Wraps the Front Geometry

The patented snap fastener
The whole EZ-Snap system runs on one idea: a patented, no-drill snap fastener. Instead of screwing a track into your fiberglass front cap, you place adhesive-backed snap studs along the surface and the skirting panel snaps onto them. It is the same fastener whether you are on a flat sidewall or wrapping the curved nose of a fifth wheel, which is what lets one system handle the front geometry that defeats rigid panels.
The studs use 3M VHB adhesive. Each stud takes about 60 seconds to place, and the bond reaches full strength in roughly 72 hours. No drill, no screws, no holes, and nothing that voids the look of your front cap.
Sealing to the ground
At the nose, the drop to the ground is the longest run on the rig, and it is where drafts sneak back in. The skirting is trimmed to reach the ground and held down along the bottom so the still-air pocket actually stays still. Because the material cuts with household scissors, you shape the bottom edge to whatever the ground under your nose is doing, uneven pads, gravel, a slope, without leaving a gap for the wind.
Access without unzipping the whole thing
Sealing the front does not mean burying your pin box. The enclosure is built so you can still get to what lives up front: the front storage, the battery bay, the hitch itself. You reach in, do what you need, and close it back up, all without pulling the whole enclosure off. That is the difference between a skirt you fight with and one you actually keep on all winter.
The Hidden Storage Nobody Talks About

Here is the part most winterizing guides miss. When you enclose the front triangle, you do not just block wind. You create a room. The cavity around the pin box that used to be open air becomes a sheltered, out-of-sight pocket under your rig, the natural home for the gear that never had a clean place to go: sewer hoses, leveling blocks, wheel chocks, the water hose you do not want freezing on the ground.
A 5th wheel front enclosure earns its keep twice. Once in the heating season, by holding your warmth in, and again year round, by turning the least useful space on your rig into the most convenient storage you have.
A DIY 5th Wheel Front Enclosure, at Your Own Pace

You do not need a shop, a crew, or a single power tool to do this. The whole system was designed so an owner can fit it solo:
- Measure the front. Work out the height and width of the front cap, the corners, and the drop to the ground.
- Place the snap studs. Peel, press, and hold each 3M VHB stud for about 60 seconds. Space them to follow the slope and turn the corners.
- Trim the panel. Diamond Weave material cuts cleanly with household scissors, so you shape it around the pin box, the hitch notch, and the ground line to fit your exact rig.
- Snap it on. The panel snaps onto the studs. Adjust, re-trim where you want a tighter seal, and set the bottom edge.
- Let it cure. The VHB bond keeps building for about 72 hours to reach full strength, so give it time before the first big blow.
There is no rush and no fixed timetable here. A front enclosure is DIY at your own pace, no drilling, and you can spread the work across a weekend or the rest of the season, whatever suits you. The Diamond Weave material is built for extreme cold, so once it is on, it stays on all winter and is backed by a Limited Lifetime materials warranty.
Which Kit Fits Your Rig
Fifth wheels come in a wide range of lengths and nose heights. If you want the front alone, the 5th Wheel Front Hitch Enclosure Kit seals the front cap and pin box for $499. It has a zippered access door to reach the hitch, and like the rest of the skirt, it trims to fit with household scissors. If you are ready to close the whole perimeter, complete EZ-Snap skirting kits run from $899 to $2,099 depending on how much rig you are wrapping, front included. Start from your rig type on the fifth wheel skirting collection, match the dimensions, and the system scales from there.
If you tow something other than a fifth wheel, the same no-drill snap system covers travel trailers, Class A, and Class C and B motorhomes. The fastener does not change. Only the shape you trim it to does.
Frequently Asked Questions
What is a 5th wheel front enclosure?
It is the panel work that closes off the open front triangle of a fifth wheel: the sloped front cap, the two front corners, the drop to the ground, and the area around the pin box and hitch. It seals that space against wind so your underbelly holds heat, and it turns the cavity into usable storage.
Do I need a special 5th wheel front hitch enclosure RV skirting kit?
You need a system that can follow the front geometry rather than a flat, rigid panel. The EZ-Snap material trims to any shape with household scissors, and the patented no-drill snaps wrap the sloped nose and turn the front corners, which is what makes it work as a 5th wheel front hitch enclosure RV skirting kit and not just side skirt. EZ-Snap offers a fifth-wheel Hitch Enclosure Kit for the front alone at $499, or a complete skirting kit that includes the front.
Can I build a DIY 5th wheel front enclosure without tools?
Yes. There is no drilling and no power tools. You place adhesive snap studs by hand, about 60 seconds each, trim the material with household scissors, and snap the panel on. It is a genuine DIY 5th wheel front enclosure that one person can fit at their own pace.
How much can a 5th wheel enclosure save on heating?
By closing the perimeter, including the front, EZ-Snap skirting can reduce heating and propane use by up to 40%. The front matters disproportionately here, because an open front cap is where the wind gets under the rig in the first place.
Will it hold up in extreme cold?
The Diamond Weave material is built for extreme cold and camping through hard winters, and every kit carries a Limited Lifetime materials warranty. EZ-Snap has been making no-drill RV skirting since 2006, with more than 38,000 customers served.
Close the Front. Keep the Heat.
The sides are the easy half. The front cap is where a winter setup is won or lost, and it is the piece the EZ-Snap snap system was built to wrap. Seal it once, with no holes in your rig, and you get a warmer floor, a lower propane bill, and a tidy storage pocket you did not know you had.
Build Your Fifth Wheel Skirting Kit
See the material, match your rig, and start your DIY 5th wheel front enclosure.
Common questions
What is a 5th wheel front enclosure?
It is the panel work that closes off the open front triangle of a fifth wheel: the sloped front cap, the two front corners, the drop to the ground, and the area around the pin box and hitch. It seals that space against wind so the underbelly holds heat, and it turns the open cavity into usable, out-of-sight storage.
Why is the front cap the coldest part of a fifth wheel?
The front of a fifth wheel is shaped like a scoop, so air catches the overhang, accelerates through the narrow gap around the pin box, and drags heat off the underbelly. Even with the sides skirted, an open front leaves the mouth of that wind tunnel wide open, where the plumbing, tanks, and floor above them lose the most heat.
Can I build a DIY 5th wheel front enclosure without tools?
Yes, there is no drilling and no power tools. You place adhesive snap studs by hand at about 60 seconds each, trim the Diamond Weave material with household scissors around the pin box and hitch notch, and snap the panel on. It is a genuine DIY job one person can fit at their own pace, spread across a weekend or the rest of the season.
How much can sealing the front save on heating?
By closing the full perimeter, including the front, EZ-Snap skirting can reduce heating and propane use by up to 40%. The front matters disproportionately, because an open front cap is where wind gets under the rig in the first place and prevents the still-air cushion from ever forming at the nose.
Do I need a special kit for the front, or just regular side skirting?
You need a system that follows the three-dimensional front geometry rather than a flat, rigid panel. The material trims to any shape with household scissors, and the patented no-drill snaps wrap the sloped nose and turn the front corners. EZ-Snap offers a fifth-wheel Hitch Enclosure Kit for the front alone at $499, or complete skirting kits from $899 to $2,099 that include the front.
Will a front enclosure hold up in extreme cold?
Yes, the Diamond Weave material is built for extreme cold and camping through hard winters, so once it is on it stays on all winter. Every kit carries a Limited Lifetime materials warranty. EZ-Snap has been making no-drill RV skirting since 2006, with more than 38,000 customers served.