How to Keep Your RV Warm in Winter (and Stop Pipes Freezing)

Key Takeaways
- Skirting is the highest-leverage winter move: it traps a still-air pocket under the floor that blocks wind before it strips heat from your plumbing.
- With the undercarriage sealed, EZ-Snap® reports heating and propane savings of up to 40%.
- Uninsulated RV water lines can begin to freeze once temperatures fall to around 20°F, so seal the belly before the first hard freeze.
- EZ-Snap kits use Diamond Weave™ fabric built for extreme cold, install no-drill with scissors, and run $899–$2,099.
The first hard freeze finds the weak spot in every rig: the open, wind-raked cavity under the floor. If you want to keep your RV warm in winter — and not wake up to a burst line — that cavity is where the work begins.
How do you keep your RV warm in winter?
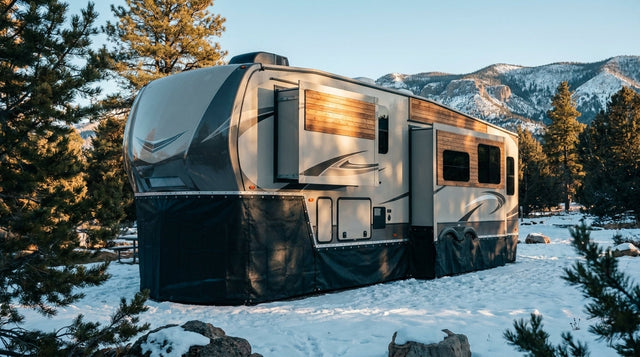
To keep your RV warm in winter, seal the open cavity under the floor with skirting so the wind can't strip heat from the underbelly. That trapped, still air protects your tanks and pipes, lets the furnace hold its temperature, and is the one step that makes everything you do above it finally work.
Most owners pour money into the cabin: a bigger furnace, a space heater on every shelf, the thermostat nudged up another two degrees. None of it solves the real problem. Cold air doesn't just sneak in through the windows. It pours into the unsealed belly of the coach, chilling your tanks, your valves, and your floor from underneath. You can run the furnace all night and still lose the fight, because you're heating air that the wind is constantly replacing.
Why your RV gets cold in winter
A parked RV loses heat in three places: through the windows, through the thin walls and roof, and — the one nobody plans for — straight down through the floor and the exposed undercarriage. That belly cavity is where your fresh, gray, and black tanks live, along with the runs of pipe that feed them. Leave it open to the wind and it behaves like a chimney, drawing warm air down and out while cold air rushes back in. Those exposed water lines are usually uninsulated, so they can start to freeze once temperatures fall to around 20°F.1
This is the difference between a cabin that holds 70°F comfortably and one where the furnace never stops cycling. Seal the underside and you change the math entirely: the heat your furnace already produces stays where you put it, and the still air trapped below acts as a buffer between the freezing ground wind and your plumbing.3 This is exactly the logic behind RV skirting for winter — close the gap, and the cold loses its way in.
Keep your RV warm in winter: the steps that actually move the needle
1. Stop the wind under the floor
Skirting is the single highest-leverage move for winter RV living, full stop.2 By wrapping the gap between the body and the ground, you trap a layer of still air around the underbelly. That motionless pocket — not an R-value, not a heater — is the mechanism. It's the same reason a sealed double-pane window outperforms a single sheet of glass: still air is one of the best insulators there is, as long as the wind can't strip it away.
This is also where the savings live. With the underside sealed, EZ-Snap reports heating and propane savings of up to 40%. Every gust that used to scour heat from under your floor is now blocked before it starts.
You can't out-heat a hard wind blowing under an open floor. Seal the undercarriage first, and everything you do above it finally starts working.
2. Protect the plumbing directly
Skirting buys you a warmer baseline, but in deep cold you want belt and suspenders. Inside the now-sealed cavity, a small, thermostatically controlled heat source keeps tank temperatures above freezing on the worst nights. Heat tape on exposed lines, foam sleeves over valve handles, and keeping a trickle of water moving on bitter nights all add margin. The point is that once the wind is gone, these measures actually hold — they're no longer fighting a constant draft.
3. Manage condensation and the cabin
A tighter, warmer rig traps more moisture. Crack a roof vent, run a small dehumidifier, and wipe down windows in the morning so condensation doesn't turn into mold or ice. Thermal curtains and reflective window panels cut the heat that escapes through the glass, which is your second-largest loss after the floor.
Why snap-on skirting beats foam board and tarps
The classic DIY answers — rigid foam panels, plywood, blue tarps weighted with bricks — all work on paper and disappoint in practice. Foam blows away unless you build a frame. Plywood is heavy, ugly, and scratches the coach. Tarps flap themselves to shreds by February. And every one of them is a chore to put up and a bigger chore to take down come spring. If you're weighing the trade-offs yourself, it's worth an honest look at DIY RV skirting before you commit a season to a stopgap, and the true cost of foam board by the third winter usually settles the question.
EZ-Snap skirting uses a Diamond Weave™ fabric built for extreme cold, so it holds up to the cold it's built to fight. It installs with a patented no-drill snap system — household scissors to cut it to your rig, snap studs to mount it. The studs stay put as a permanent attachment point; the skirting itself unsnaps in spring and rolls up for storage. Skirting kits run $899–$2,099 depending on the size of your rig, and the materials carry a Limited Lifetime warranty.

One winter note worth flagging before you order: the 3M™ VHB adhesive studs need roughly 60°F to cure properly. If you're installing once it's already cold, plan on the screw or combo studs instead — same skirting, a mounting method that doesn't depend on warm weather.
The bottom line
Keeping your RV warm in winter isn't about buying a bigger heater. It's about closing the one gap that lets the wind undo all your heating. Seal the undercarriage, protect the plumbing inside that sealed space, and manage the cabin — in that order. Do the first step well and the rest gets dramatically easier.
EZ-Snap has been shipping factory-direct skirting since 2006 and has served 38,000+ customers, with skirting rated 4.9 across 164 reviews by owners who've put it through real winters. When you're ready to size a kit to your rig, you can build your RV skirting kit and get the undercarriage sealed before the next freeze.
Sources
- Southern states generally start having issues with frozen pipes when the temperature reaches about 20 degrees Fahrenheit; bathroom and kitchen pipes are generally not insulated and rely on the heating system to keep warm. U.S. Department of Energy (Energy Saver), 2024 ↗
- DOE lists "Install insulated skirting" and "Add insulation to the belly" among the energy-efficiency improvements that substantially reduce heat loss in manufactured homes; it also recommends air sealing openings around plumbing and ducts. U.S. Department of Energy (Energy Saver), 2024 ↗
- DOE/NREL Weatherization job aid 15-1 directs installers to fill the entire belly cavity to the prescribed R-value 'while ensuring plumbing has sufficient insulation value to prevent condensation or freezing,' creating a 'consistent thermal boundary between conditioned and unconditioned space,' and to reinstall any removed skirting. U.S. Department of Energy / National Renewable Energy Laboratory (Weatherization Assistance Program, Job Aid 15-1), 2024 ↗