3M Adhesive Snap Fasteners
Will these really stand up in the searing heat of the summer and extremely cold winter weather?
How should I prep the surface before I stick the 3M studs?
 The adhesive studs will stick extremely well when applied correctly. They require a flat clean surface with no film or residue. Do not appy in freezing temperatures. We recommend cleaning the surface with isopropyl alcohol (Rubbing Alcohol) or a 50/50 solution of isopropyl alcohol and water. It works well on surfaces like metal, vinyl, plastic and fiberglass. (Do not install on wood).
They should be installed in warmer temperatures, preferably at least +15c/60F, but better yet is 21c/70F or warmer (for 3 to 4 days and nights).
** They should be pressed into place with a minimum of 15 lbs of pressure.
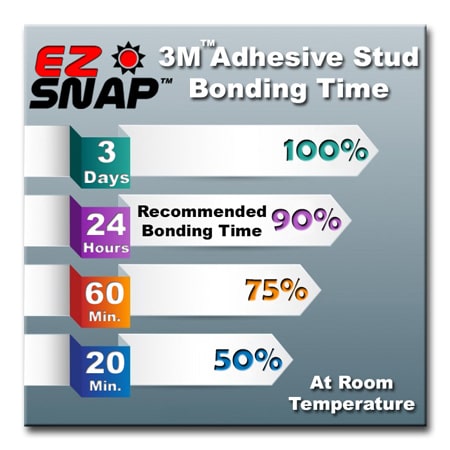
The chart to the right shows the approximate bonding time at room temperature. As you can see, time and temperature will significantly increase the bond strength of these type of studs. It is for this reason that we suggest that you place all of your adhesive studs first, allowing them more time to bond before you snap your product to them. Putting them on 24 hours before you install your shades is ideal.
Important: * Bond strength is dependent upon the amount of adhesive-to-surface contact developed. Firm application pressure develops better adhesive contact and helps improve bond strength.
I was thinking of using these studs on the windshield of my car so I can make a quick snap on shade for my windshield. Will they stick to glass?
How do I remove the 3M studs from its mounting surface if I want to change the color?
The EZ Snap adhesive studs are designed to stand up to all types of extreme weather conditions. Canadian winters and Arizona heat, as well as, extreme wind forces. The ingredient that allows this extreme holding power is the magic of the VHB adhesive by 3M.
But what if you want to remove the studs one day for example, to change them to a different color? Follow the steps below and you can make it like they were never there.
Removal procedure:
- Grip and peel off the plastic part of the stud using pliers (needle nose are ideal).
- At this point you will most likely have quite a bit of the flexible foam left behind on the mounting surface. Using your thumb or a rag, roll off this excessive foam as much as possible.
- When you have removed as much of the flexible foam as you can, the remainder can be removed using a citrus oil based cleaner, such as “Goo Gone” or Goof Off”. These cleaners are designed to break the bond of the VHB adhesive.
- Continue to apply the citrus oil cleaner until the adhesive is completely gone.
- Cleaner area to remove any citrus oil reside using a 50/50 mixture of water and isopropyl alcohol before installing another adhesive stud.
I used these adhesive studs on my painted wood window frame and they fell off in just a few years. What happened?
EZ Snap® Breakthrough Fastener Innovation
Patented Snap System Designed For Exterior Shades & RV Skirting.
This amazing “No-Drill” Fastener System allows the average do-it-yourselfer to install Exterior Shade Screens or RV Skirting, with no experience and without specialized tools… Making it easy for you to have professional-looking results every time.
3M Adhesive Studs stick well on smooth, flat, non-textured surfaces such as vinyl window frames, aluminum, plastic, and fibreglass. If installing EZ Snap® Fasteners on wood, we recommend using our Stainless Steel Screw-in Studs.
NOTE: We recommend Fasteners be spaced at MAXIMUM 5 to 10 inches apart, depending on your project.
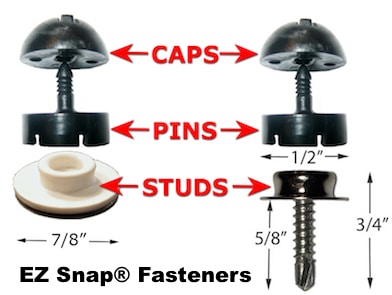
EZ Snap® Studs attach securely to your mounting surface. 3M Fasteners are available in four colours, designed to match most window frames, RVs, or other mounting surfaces. Stainless Steel Studs look similar to the snaps used on most boat tops.
EZ Snap Pins snap securely onto the mounted Studs and feature a small, sharp plastic shaft that pokes through the Shade or RV Skirting Material. Caps are pressed onto the Pins (with Shade Mesh or RV Skirting in between) and lock permanently onto the Pins.
The caps and pins stay permanetly locked together on the fabric. The Studs remain on the mounting surface on your window frames or RV. This allows for easy removal and replacement when desired, using the EZ Snap® Removal Tool.
Types of EZ Snap Fasteners…
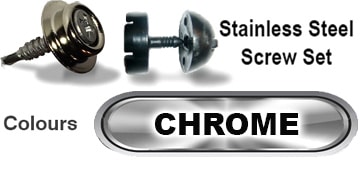
Stainless Steel Screw Stud Sets
Uses & Benefits:
- Self Tapping Screw: Screws do not need pre-drilling on most surfaces.
- RV Skirting: Perfect for installs below 15°c/16°f
- Sun shades: Installs onto a wood or porous surface.
- Sun shades: Installs onto brick, cement or Stucco with “Stucco Kit” add-on.
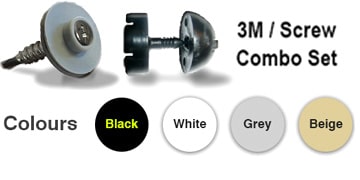
3M/Screw COMBO Stud Sets
Uses & Benefits:
- Color Matching: 4 Stud color available to match mounting surface
- 3M Seals around screw hole: Adhesive forms water-resistant barrier around S.S. screw hole.
- RV Skirting: Perfect for installs below 15°c/16°f (Strongest Fastener Type)
- Sun shades: Installs onto a wood or porous surface.
- Sun shades: Installs onto brick, cement or Stucco with “Stucco Kit” add-on.
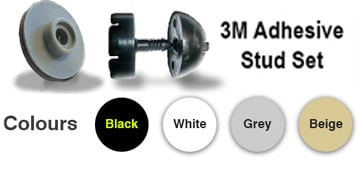
3M Only Adhesive Stud Sets
Uses & Benefits:
- Color Matching: 4 Stud color available to match mounting surface
- 3M Only: There are no screw holes with this stud style
- RV Skirting: For installs when temperature is ABOVE 15°c/16°f
- Sun shades: Requires clean, flat surface / Surface prep required / Spacing is IMPORTANT !
- Skylight shades: Leak-Free install – “No Screw Holes”
“How the Caps and Pins work”…
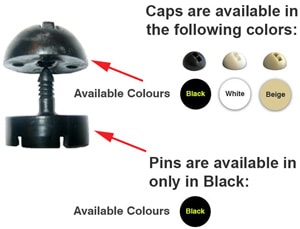
“The Magic of EZ Snap”
The EZ Snap® cap and pins are what make EZ Snap® so easy to install.
- The female base of the pin snaps onto the male part of the type of stud you have chosen (Screw, 3M/Screw COMBO or 3M only).
- Once the pins are snapped onto the studs, puncture the pin end through the material. (Shading mesh or RV Skirting).
- IMPORTANT: Ensure that you have pushed the material down the very base of the pin.
- Next, push on the female caps onto the pin. This locks the material into the pin.
- The pin and cap now stay together, locked on the fabric.
EZ Snap® Studs & 3M™ V.H.B.

- Available in White, Beige, Gray & Black.
- The EZ Snap® “Peel & Stick“ – “No Drill” studs. With Super Hold 3M™ VHB
- The 3M™ VHB adhesive is very strong and has a proven track record of performance.
- Works on Skylights, Windows, RV’s & Yachts…
You can even stick a stud on your boat or marine application and it will stand up to severe conditions like severe cold, wet conditions in both fresh and salt water. They are also designed to work with the standard snaps found on boat tops.
Learn More about 3M™ VHB Adhesive.

EZ Snap Fastener Installation Tips:
Install in warmer temperatures, preferably at least +15c/60F, but better yet is 21c/70F or warmer.
Fasteners should be pressed into place with a minimum of 15 lbs of pressure.
Clean surface first with 50/50 isopropyl alcohol and water mixture to remove any film, dirt or oxidization. 3M recommends using Primer Pen for best results.
After 3M studs have been installed, wait a minimum of 60 minutes before you install the shading mesh, 24 hours is ideal.
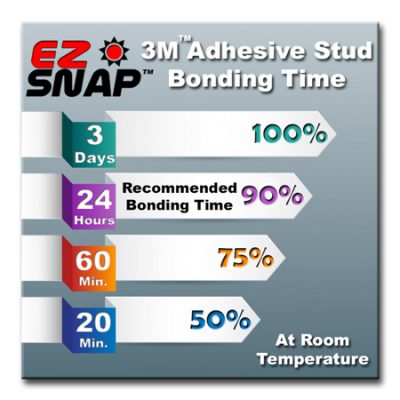
3M Adhesive Bonding Times:
The chart to the right shows the approximate bonding time at room temperature. As you can see, time and temperature will significantly increase the bond strength of these type of studs. It is for this reason that we suggest that you place all of your adhesive studs first, allowing them more time to bond before you snap your product to them. Mounting Studs 24 hours before installing Shades or Skirting is ideal.
For more detailed instructions, check out our Frequently Asked Questions page here.
Stainless Steel Studs (Self Tapping)
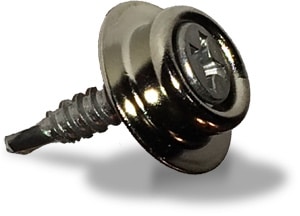 The EZ Snap screw stud is made using stainless steel for long lasting, corrosion free performance. Although it can be used in any type of EZ Snap application, it is ideal for wooden window frames, were the 3M stud has trouble sticking long term.
The biggest benefit of using the screw in studs, is that they are a mechanical fastener and you do not have to worry about surface prep or installation temperature when you install them.
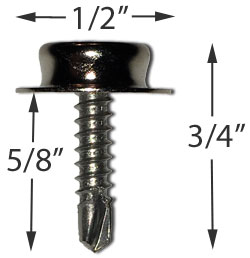
This makes the Stainless Steel Screw-in Studs the preferred fastener for our RV skirting product.
The screw studs specs:
The stainless steel screw stud is self tapping (for wood, PVC and Lightweight aluminum window frames) and has a screw shaft that is 7/16″ in length.
If you are attaching EZ Snap onto stucco, brick or concrete, made sure to order the screw stud with stucco kit when you check out. See below for more info…
Deluxe EZ Snap Removal Tool & Fabric Cutter for Adhesive and Screw-in Studs
The Deluxe Removal Tool is designed to be used with 3M Adhesive and the Stainless Screw-in Studs.
How to Use Removal Tools:
To avoid putting extra strain on your fasters, shade mesh, and RV skirting, use your removal tool to assist with separating the two sides of your EZ Snap fasteners.
Simply slide the prongs or the flat edge between the stud and the base of the pin. Pry the pin away from the stud until the pin unsnaps from the stud.
The pin and cap stay locked together in the fabric, ready to be snapped back onto the stud again in the spring.
Many of our customers leave thier EZ Snap shades up all year round as there is no need to remove them for winter, unless you want the heat from the sun to help warm your home.
