How can we help you?
Before You Begin
Here’s a general overview with some important points you need to be aware of before you start your project.
Planning…
Have your Shade measurements and Fastener requirements for all of your windows and skylights. We recommend using the EZ Snap Kit Size Calculator to figure out the most efficient layout before you start cutting your Shade Mesh. Best to measure twice, cut once.
If installing multiple Shades, lay out and cut Shades from the 72 inch tall Shade Mesh included in each kit. Nest your Shades together for the most efficient fit.
Count out Fasteners and mark their locations on window perimeter, making sure you have enough Caps, Pins & Studs.
Fasteners…
MAXIMUM 10 inch spacing between Fasteners recommended on most installations. If your shade piece is 25 square feet or larger or you are in high wind area, then MAXIMUM 5 inch spacing.
Adhesive Studs are NOT recommended for wood surfaces. They stick well on surfaces like vinyl, aluminum, and fibreglass. Mounting surface must be minimum 7/8 inch wide, flat, non-textured, and cleaned properly (see Step #3 Clean & Prep Surface, below).
If installing on wood, you need to use the Screw-in Studs. Be careful not to over-tighten screws.
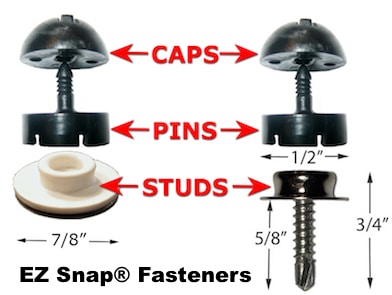
All Pins & Caps work with both Adhesive and Screw Studs.
Pins & Caps:
Lock permanently together around perimeter of Shades.
Studs (Adhesive or Screw-in):
Attach permanently around perimeter of window or skylight.
When removing Shades (after installation) please use the EZ Snap Cutting & Removal Tool to gently pry apart the Pins & Studs. This will safely separate the EZ Snaps without putting excess force on the Studs or the Shades.
Your Pins & Caps will remain on the Shades. Studs will remain around windows or skylights… ready for re-installation of Shades, when desired.
Shades…
EZ Snap Shades are optical grade fabric that won’t hinder your view when looking out your windows. If installed over bug screens, you may see a moray pattern or ‘tiger stripe’ effect.
EZ Snap Shade material will not stretch or fray.
When unrolling Shade Mesh, you will notice it has a natural curl from being rolled up. The fabric should be installed with the corners curling towards the glass, for a more professional look.
Please do not stretch fabric between Pins. If excessive tension is used from Pin to Pin, Adhesive Stud failure may occur. Shades must be installed with little or no tension on the mesh. More like hanging a poster, less like stretching a drum skin.