How can we help you?
Shade Fabric Placement
EZ Snap Shades are Exterior Shades
The Shade Mesh must be mounted on the outside (between the sun and the glass) in order to effectively reduce heat.
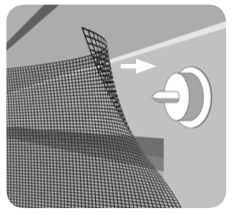
Which Side Out?
The Shade Mesh has a slight curl to it when it comes off the roll. When you place the Shade Mesh over your window or skylights, the corners should curl in towards your frames.
Another way to explain… the side of the Shade Mesh that faces the outside of the roll should be installed to face the sun… and the side that is on the inside of the roll should face your window or skylight.
The Shade Mesh will function either way, but makes for a cleaner installation when you follow these tips.
Install Shades Onto Pins
Starting in the top left corner, push Shade Mesh down onto Pins until the Pin punctures through.
Push straight down to avoid bending and snapping off the Pin.
It is important to push Shade Mesh to the very base of each Pin using the metal end of the EZ Snap Removal Tool. This exposes all of the Pin’s teeth so that the matching interlocking teeth on the Cap can fully lock on.
Move from one pin to the next, working from top to bottom and left to right.
Install Caps Last
Adjust Shade Mesh on the Pins, as needed, to remove any wrinkles. Pulling Shade Mesh off Pins (to adjust the position) and poking a new hole is OK, if necessary, as long as you have not yet put the Cap on the Pin.
No Stretching
Put little or no tension on Shade Mesh. Please do not stretch fabric between Pins.
Placing Shade Mesh is more like hanging a poster, less like stretching a drum skin. If excessive tension is used from Pin to Pin, Adhesive Stud failure may occur.