Is Your Vinyl Siding Melting? Find Out The Cause And The Solution
Why is my vinyl siding warping?
It’s happening to homes across North America and homeowners are scrambling to fix their siding only to see it warp again.
It’s a relatively new phenomenon and while the vinyl siding might seem to warp out of the blue, it’s actually being caused by the sun reflecting off of windows that are coated with Low-E film.
Low-E film is a reflective coating that’s applied to windows so they can reflect heat and make homes more energy efficient.
However, under the right conditions, the sun can bounce off the Low-E window and concentrate into a powerful beam that can reach temperatures well over 200° F.
So, most of the time when vinyl siding melts or warps it’s because that’s where a beam from a Low-E window has landed.
The reason why the siding warps is not because it’s a defective product. It was just never intended to be exposed to temperatures that high, as most vinyl siding will melt at just 165° F.
Just one Low-E glass window can easily cause thousands of dollars in damage.
Most people don’t even realize what’s happening or why, they just see that large patches of siding have been warped or artificial turf has been scorched.
This is a relatively new problem and it’s rapidly growing every year because most new homes are being built with Low-E windows.
Melted siding has now become so widespread that the major vinyl siding manufacturers have updated their warranties to exclude damage from heat caused by window reflections.
Making things even more complicated is that a lot of the time it’s a neighbor’s Low-E window that is causing the damage.
So if this is happening to you or your neighbor, do not replace any damaged siding or artificial grass yet.
The window is the source of the heat beam, so that needs to be addressed first.
If you replace your siding or your turf without first fixing the window, you’ll just end up having to replace the same things again and again.

What’s the best way to stop my siding from melting?
The window is the problem, specifically the way the sun is reflecting off the Low-E coating.
Replacing the window may seem like the most obvious solution, but it’s not necessary.
Getting a window replaced is costly, and most Low-E glass windows are relatively new, energy-efficient, and are otherwise in good working order.
As long as you can block the sunlight from hitting the window in the first place, you can stop the heat beam from forming.
Do not install a product between the vinyl siding and the window as a means of protecting the house.
Anything that is in the path of the heat beam will get damaged, so installing something like a fence or umbrella would just mean constantly replacing something else instead of siding.
The key is to keep direct sunlight off the Low-E window.
Common ways to prevent your vinyl siding from melting are:
- Installing an awning over the Low-E window that’s causing the issue.
- Planting some shade trees in from of the low-e window.
- Investing in heat resistant siding.
- Installing shade screen over the Low-E window.
Some people recommend installing awnings over their Low-E windows as a way to block the sun from hitting them.
This solution can work because it blocks the sun from directly hitting the glass, but it does have some drawbacks.
It’s one of the more expensive options, and awnings require a lot of maintenance.
They can easily get damaged by wind if they are left extended, so they can really only be used so long as you are home.
Retracting your awning every time you leave the house may mean that the sun can still hit your Low-E window and form hot spots.
So even with an awning, you could still run into the same melted siding problems.
Planting some strategic trees as a means of shade would work, but again it’s not a practical solution.
Shade trees are expensive and not everyone has the available space to be able to plant a large shade tree.
Replacing melted siding with a heat-resistant type of siding is an option, but it’s by far the most costly as it would mean having to replace the siding for the entire house.
Some people have taken the step to replace their siding with heat-resistant vinyl siding.
This is by far the most expensive option as it can easily run into the thousands of dollars to replace the existing siding on a house with heat-resistant siding.
The easiest and cheapest solution is to cover the window that’s causing the damage.
Painting over the outside of the window is cheap and easy and provides an immediate fix to the problem.
However, the entire point of having a window in the first place is to get natural light into your space.
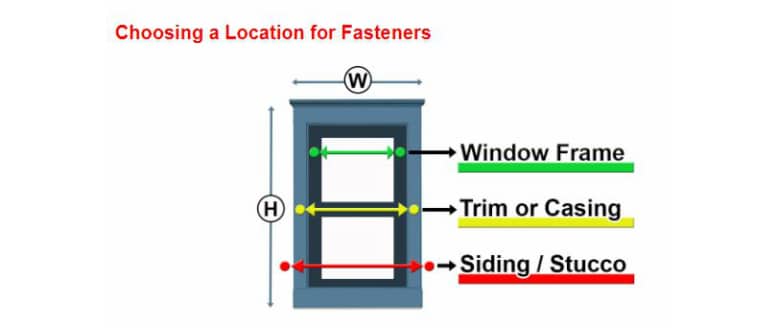
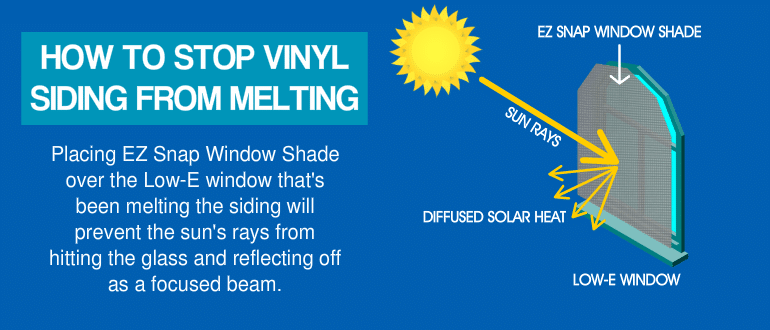
Installing EZ Snap window shade over the Low-E window is the best way to fix a window while still keeping natural light.
EZ Snap works by blocking 90 percent of the sun’s heat and light from ever reaching the glass.
What does reflect off the glass gets filtered a second time on its way back out, ensuring that no hot spots can form from any Low-E glass reflections.
To see how well the shading mesh works in action, here’s a review a customer sent in who had a Low-E window that was melting their siding. The video shows both the before and after of how EZ Snap stopped the hot spots from forming.
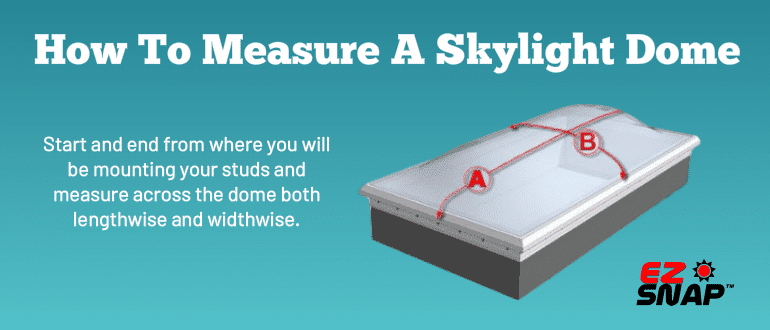
EZ Snap can be installed on almost any size and type of window.
Because EZ Snap uses an optical grade mesh, you still get to keep your view as well.
It’s also easy enough to install that you don’t need any previous experience.